Sushi is the ultimate take away- fast food! It is super tasty, nutritious and so much easy to make then you probably realize! It makes for a great work lunch, children’s lunch box idea or party finger food munch.
I make sushi at least every other week, and it has become my go to food to take to races, and on road trips. It is just so versatile, and easy to digest. It is also a great balanced meal, containing veggies, carbs and protein.
In this post I hope to show you how easy it can be to make your very own sushi! No joke.
- So, first things first, you will need to cook the rice (although you could also use cauliflower rice if you want to go grain free!). I would suggested that you cook sushi rice according to the pack instructions- it typically takes about 15 minutes to cook and then requires about 20-30 minutes of sitting/ steam time (when the heat is off, the pan has been removed from the cooker, but the lid is on the rice).
- Whilst the rice is cooling, you can prepare your fillings! Cut your favourtie veggies, protein and any other fillings that you would like and and set aside. I love using a mix of crunchy veggies and soft tofu to fill my sushi. But use whatever you fancy. A great classic combo is crab, avocado and cucumber.
- Right back to the rice- once it is cooked, and cooled slightly, you can stir in a little rice wine vinegar- this helps to prevent the rice from getting too sticky and adds a little tangyness. But it is not essential- so do not stress if you don’t have any!
Next is the fun part! Making the sushi!
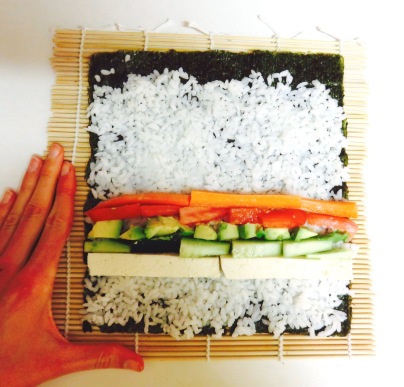
- Simply, get your seaweed sheet and lay it on your sushi mat (shiny side down). NB: If you don’t have a sushi mat, you can use tin foil/ cling film/ or a tea towel. Then spoon on your rice. You will need to squish it down, and try and get it to cover the whole sushi sheet width wise, but leave about an inch at the top of the sheet to make it easier to close the roll! Aim to have a layer of rice that is about 1-2 grains thick. Don’t go crazy or you won’t be able to fit in your fillings!
- Next comes the veggies and protein. Simply layer your veggies neatly about 2 inches from the end of one side of the seaweed sheet. As shown below.
- Once you have lined up your fillings, then it is time to roll your sushi up! To do this, you will need to be gentle but firm. Pick up the end of your sushi mat and your sushi and quickly roll it over, pressing the fillings down with your fingers. Continue to roll the sushi up as if you were making a swiss roll or rolling up a towel after a day at the beach!
Remember to keep pressing as you roll to ensure that your sushi is tight and your fillings are kept in place.

Just keep rolling…..

Once you have rolled your sushi up you should have a neat roll like the one shown here!

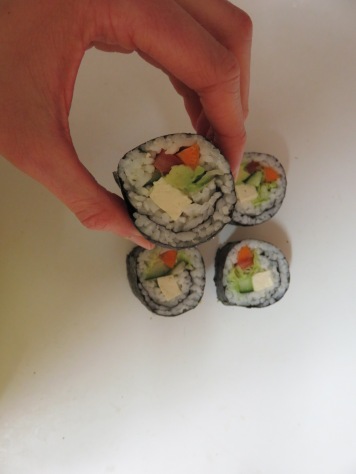
- Next comes for the slicing. Make sure you use a sharp knife for this! I can usually get about 5-6 pieces of decent sized sushi from one roll. I would suggest making 1-2 rolls per person per meal- depending on the amount of fillings you use, and whether or not you will be serving your sushi with anything else!

Your sushi should look nice and neat like these here! It would be great if we could see your sushi creations- so if you do go ahead and make some of your own then please tag us in your posts on Intagram (@trainandchew)!
This sushi was destined for my lunch box- just wanted to show you how easy homemade sushi is to transport! I had two rolls for my lunch. Both filled with veggies and tofu. I then took a couple of sachets of soy sauce to drizzle over my sushi when lunch time came around! So yummy 🙂

